> ## Documentation Index
> Fetch the complete documentation index at: https://specterops-bp-2641-crowdstrike-integration.mintlify.site/llms.txt
> Use this file to discover all available pages before exploring further.
# Integrate BloodHound with Falcon for IT
> Learn how to install and configure the CrowdStrike Falcon for IT integration for BloodHound Enterprise.
 The BloodHound Enterprise CrowdStrike Falcon Foundry Application is a native, serverless integration that automatically collects sessions, local groups, user rights assignment (LSA), and registry key data from CrowdStrike Falcon agents installed on endpoint hosts. The application then sends that data to your BloodHound Enterprise tenant.
This guide shows you how to install the Foundry application, configure the BloodHound Enterprise connection, set up the required queries, and confirm that telemetry reaches Falcon Next-Gen SIEM.
Use this integration to:
* Install the app from CrowdStrike Marketplace and configure the BloodHound Enterprise connection
* Scope Falcon for IT (FFIT) query collection to specific Falcon host groups
* Route endpoint telemetry into Falcon Next-Gen SIEM for ingestion into BloodHound Enterprise
After configuration is complete, the application handles the following actions automatically:
| Automated behavior | Description |
| --------------------------------------- | --------------------------------------------------------------------------------------------------------- |
| **Provision and schedule FFIT queries** | Deploys the required query set and runs it on the configured schedule for the selected Falcon host groups |
| **Route collected data to LogScale** | Sends the collected endpoint telemetry into Falcon Next-Gen SIEM (LogScale) for processing |
| **Run serverless ingestion** | Uses Foundry Functions to fetch, transform, and ingest data into BloodHound Enterprise |
| **Track host reporting state** | Uses a Daily Status Table in Foundry Collections to track which hosts reported during the current cycle |
| **Retry incomplete collection** | Retries and reconciles incomplete runs to improve host coverage |
## Prerequisites
Before you begin, ensure that you have the following:
| Requirement | Details |
| -------------------------------- | -------------------------------------------------------------------------------------------------------------------------------------------------------------------------------------------------------------- |
| **CrowdStrike Falcon access** | A CrowdStrike Falcon account with permission to manage FFIT live asset queries, install Foundry apps, execute Fusion SOAR workflows, and access Next-Gen SIEM Event Search |
| **Windows device** | At least one Windows device with the [CrowdStrike Falcon sensor installed](https://www.crowdstrike.com/en-us/resources/videos/how-to-install-falcon-sensor/) and visible in the Falcon host management console |
| **Host grouping** | Add the target Windows devices to an existing or newly created Host Group. This group defines the scope of RTR script execution. |
| **Group ID** | Locate and save your Host Group ID. You need this parameter during Managed Application configuration. |
| **BloodHound Enterprise access** | A BloodHound Enterprise tenant URL and a BloodHound Enterprise [non-personal API key/ID pair](/integrations/bloodhound-api/working-with-api#create-a-non-personal-api-key%2Fid-pair) with the **Auditor** role |
## Install the application
Install the CrowdStrike Foundry application and configure credentials for BloodHound Enterprise.
1. Log in to CrowdStrike Falcon with an account that has permission to install Foundry applications.
2. Go to **Foundry** > **App catalog**.
The BloodHound Enterprise CrowdStrike Falcon Foundry Application is a native, serverless integration that automatically collects sessions, local groups, user rights assignment (LSA), and registry key data from CrowdStrike Falcon agents installed on endpoint hosts. The application then sends that data to your BloodHound Enterprise tenant.
This guide shows you how to install the Foundry application, configure the BloodHound Enterprise connection, set up the required queries, and confirm that telemetry reaches Falcon Next-Gen SIEM.
Use this integration to:
* Install the app from CrowdStrike Marketplace and configure the BloodHound Enterprise connection
* Scope Falcon for IT (FFIT) query collection to specific Falcon host groups
* Route endpoint telemetry into Falcon Next-Gen SIEM for ingestion into BloodHound Enterprise
After configuration is complete, the application handles the following actions automatically:
| Automated behavior | Description |
| --------------------------------------- | --------------------------------------------------------------------------------------------------------- |
| **Provision and schedule FFIT queries** | Deploys the required query set and runs it on the configured schedule for the selected Falcon host groups |
| **Route collected data to LogScale** | Sends the collected endpoint telemetry into Falcon Next-Gen SIEM (LogScale) for processing |
| **Run serverless ingestion** | Uses Foundry Functions to fetch, transform, and ingest data into BloodHound Enterprise |
| **Track host reporting state** | Uses a Daily Status Table in Foundry Collections to track which hosts reported during the current cycle |
| **Retry incomplete collection** | Retries and reconciles incomplete runs to improve host coverage |
## Prerequisites
Before you begin, ensure that you have the following:
| Requirement | Details |
| -------------------------------- | -------------------------------------------------------------------------------------------------------------------------------------------------------------------------------------------------------------- |
| **CrowdStrike Falcon access** | A CrowdStrike Falcon account with permission to manage FFIT live asset queries, install Foundry apps, execute Fusion SOAR workflows, and access Next-Gen SIEM Event Search |
| **Windows device** | At least one Windows device with the [CrowdStrike Falcon sensor installed](https://www.crowdstrike.com/en-us/resources/videos/how-to-install-falcon-sensor/) and visible in the Falcon host management console |
| **Host grouping** | Add the target Windows devices to an existing or newly created Host Group. This group defines the scope of RTR script execution. |
| **Group ID** | Locate and save your Host Group ID. You need this parameter during Managed Application configuration. |
| **BloodHound Enterprise access** | A BloodHound Enterprise tenant URL and a BloodHound Enterprise [non-personal API key/ID pair](/integrations/bloodhound-api/working-with-api#create-a-non-personal-api-key%2Fid-pair) with the **Auditor** role |
## Install the application
Install the CrowdStrike Foundry application and configure credentials for BloodHound Enterprise.
1. Log in to CrowdStrike Falcon with an account that has permission to install Foundry applications.
2. Go to **Foundry** > **App catalog**.
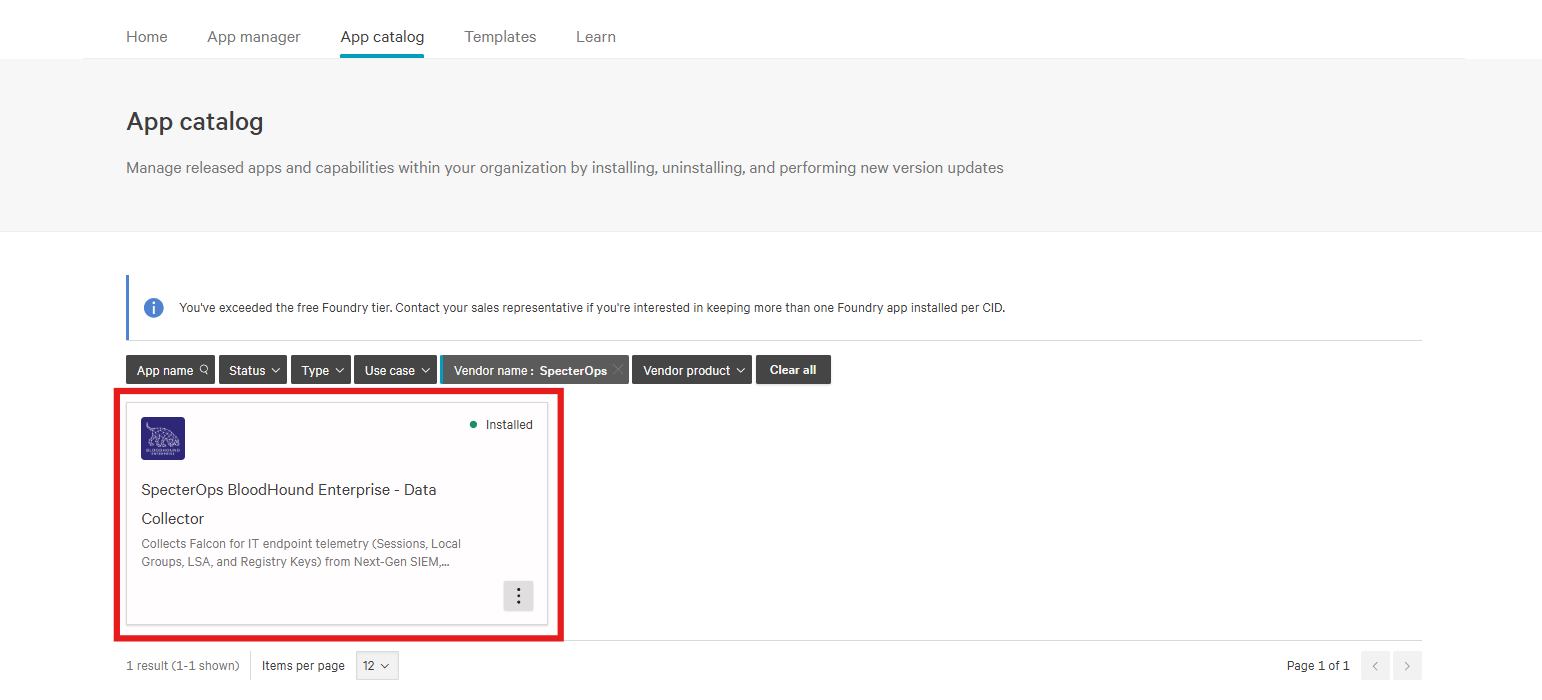 3. Select the **SpecterOps BloodHound Enterprise - Data Collector** application.
4. Click **Install Now**.
5. After installation completes, click **Open App**.
Configure the connection values that the Foundry application uses to validate credentials and upload data to BloodHound Enterprise.
| Field | Description |
| -------------------------------- | ----------------------------------------------------- |
| **BloodHound Enterprise Domain** | The URL of your BloodHound Enterprise tenant |
| **Token ID** | The API token ID used to authenticate requests |
| **Token Key** | The API token key used to sign and authorize requests |
This integration supports a maximum of one BloodHound Enterprise instance.
3. Select the **SpecterOps BloodHound Enterprise - Data Collector** application.
4. Click **Install Now**.
5. After installation completes, click **Open App**.
Configure the connection values that the Foundry application uses to validate credentials and upload data to BloodHound Enterprise.
| Field | Description |
| -------------------------------- | ----------------------------------------------------- |
| **BloodHound Enterprise Domain** | The URL of your BloodHound Enterprise tenant |
| **Token ID** | The API token ID used to authenticate requests |
| **Token Key** | The API token key used to sign and authorize requests |
This integration supports a maximum of one BloodHound Enterprise instance.
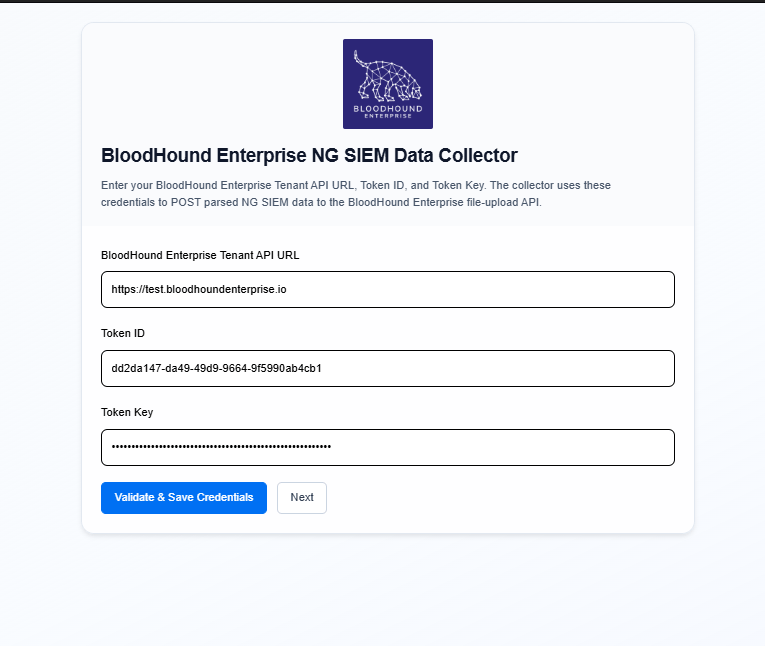 1. Click **Validate & Save Credentials**.
The application stores the validated BloodHound Enterprise API credentials in the Foundry Secret Store.
2. Confirm that validation succeeds before you continue.
After the credentials are saved successfully, click **Next** to open the **Installation Success** page.
Use this page to review the integration status, data collection schedules, and verification steps.
1. Click **Validate & Save Credentials**.
The application stores the validated BloodHound Enterprise API credentials in the Foundry Secret Store.
2. Confirm that validation succeeds before you continue.
After the credentials are saved successfully, click **Next** to open the **Installation Success** page.
Use this page to review the integration status, data collection schedules, and verification steps.
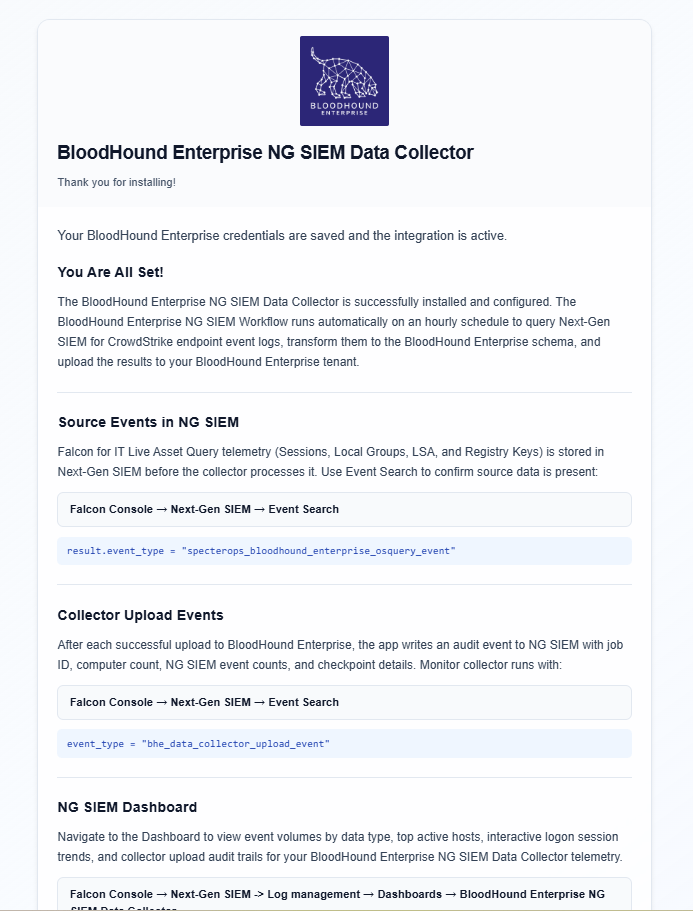 After installation and configuration are complete, the BloodHound Enterprise NG SIEM Workflow runs automatically every hour.
The workflow retrieves CrowdStrike endpoint event logs from Next-Gen SIEM, transforms them to the BloodHound Enterprise schema, and uploads the data to your BloodHound Enterprise tenant.
## Configure queries
Before the Foundry workflow can upload data to BloodHound Enterprise, the required Windows endpoint telemetry must exist in Falcon Next-Gen SIEM.
This section shows you how to save and schedule the required queries in the CrowdStrike Falcon console so your target Windows hosts continuously send data to Next-Gen SIEM.
### Required queries
Use the following four queries when you configure collection in CrowdStrike Falcon. Copy, save, and schedule each query separately.
```sql theme={null}
SELECT
'bloodhound_enterprise_windows_endpoint_osquery_result' AS event_type,
'session' AS data_type,
logon_id,
user,
logon_domain,
logon_type,
logon_time
FROM logon_sessions;
```
```sql theme={null}
SELECT
'bloodhound_enterprise_windows_endpoint_osquery_result' AS event_type,
'local_groups' AS data_type,
g.groupname,
u.username
FROM groups g
JOIN user_groups ug ON g.gid = ug.gid
JOIN users u ON ug.uid = u.uid;
```
```sql theme={null}
SELECT
'bloodhound_enterprise_windows_endpoint_osquery_result' AS event_type,
'user_rights_assignment' AS data_type,
g.groupname,
u.username
FROM groups g
JOIN user_groups ug ON g.gid = ug.gid
JOIN users u ON ug.uid = u.uid
WHERE g.groupname = 'Remote Desktop Users'
OR g.groupname = 'Administrators';
```
```sql theme={null}
SELECT
'bloodhound_enterprise_windows_endpoint_osquery_result' AS event_type,
'registry_key' AS data_type,
name,
type,
data
FROM registry
WHERE path IN (
'HKEY_LOCAL_MACHINE\SYSTEM\CurrentControlSet\Control\Lsa\MSV1_0\ClientAllowedNTLMServers',
'HKEY_LOCAL_MACHINE\SYSTEM\CurrentControlSet\Control\Lsa\MSV1_0\NtlmMinClientSec',
'HKEY_LOCAL_MACHINE\SYSTEM\CurrentControlSet\Control\Lsa\MSV1_0\NtlmMinServerSec',
'HKEY_LOCAL_MACHINE\SYSTEM\CurrentControlSet\Control\Lsa\MSV1_0\RestrictReceivingNTLMTraffic',
'HKEY_LOCAL_MACHINE\SYSTEM\CurrentControlSet\Control\Lsa\MSV1_0\RestrictSendingNTLMTraffic'
);
```
1. Log in to CrowdStrike Falcon.
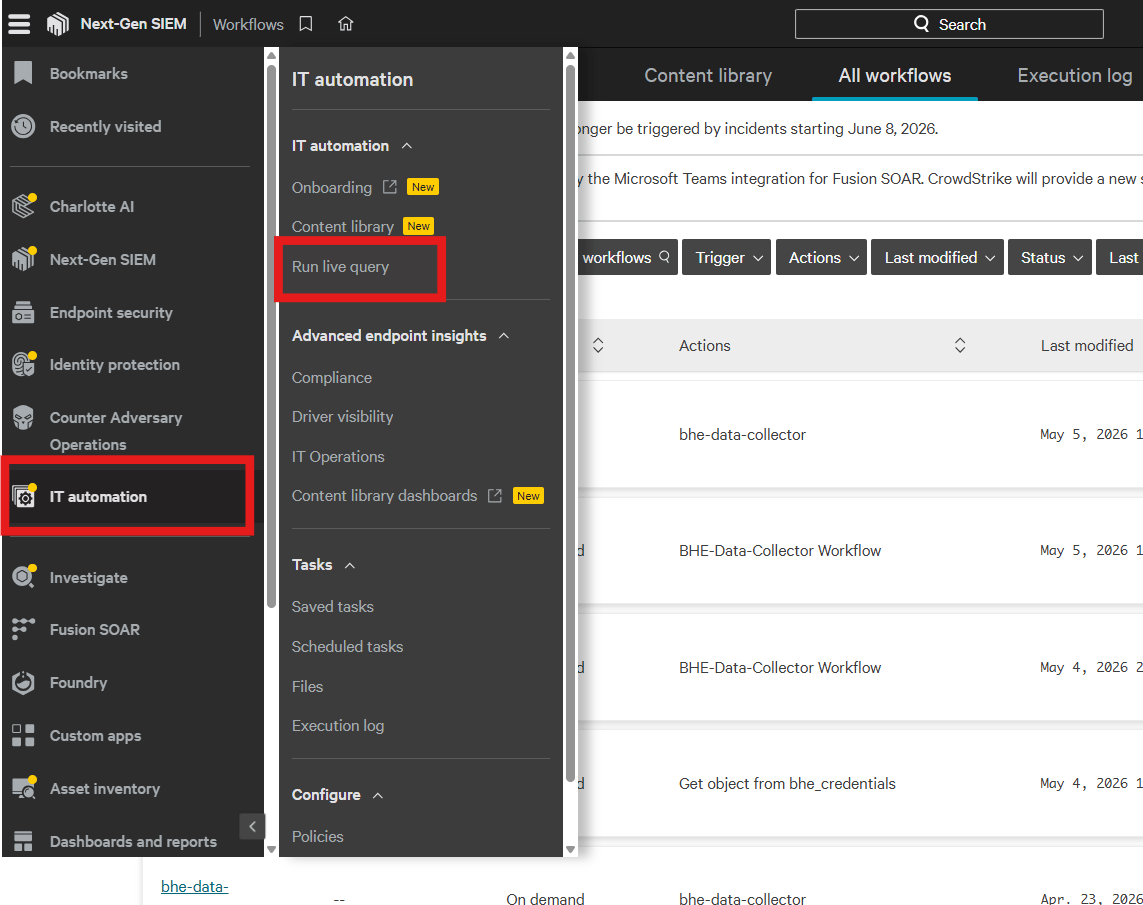
2. Click **IT Automation** > **Run live query**.
After installation and configuration are complete, the BloodHound Enterprise NG SIEM Workflow runs automatically every hour.
The workflow retrieves CrowdStrike endpoint event logs from Next-Gen SIEM, transforms them to the BloodHound Enterprise schema, and uploads the data to your BloodHound Enterprise tenant.
## Configure queries
Before the Foundry workflow can upload data to BloodHound Enterprise, the required Windows endpoint telemetry must exist in Falcon Next-Gen SIEM.
This section shows you how to save and schedule the required queries in the CrowdStrike Falcon console so your target Windows hosts continuously send data to Next-Gen SIEM.
### Required queries
Use the following four queries when you configure collection in CrowdStrike Falcon. Copy, save, and schedule each query separately.
```sql theme={null}
SELECT
'bloodhound_enterprise_windows_endpoint_osquery_result' AS event_type,
'session' AS data_type,
logon_id,
user,
logon_domain,
logon_type,
logon_time
FROM logon_sessions;
```
```sql theme={null}
SELECT
'bloodhound_enterprise_windows_endpoint_osquery_result' AS event_type,
'local_groups' AS data_type,
g.groupname,
u.username
FROM groups g
JOIN user_groups ug ON g.gid = ug.gid
JOIN users u ON ug.uid = u.uid;
```
```sql theme={null}
SELECT
'bloodhound_enterprise_windows_endpoint_osquery_result' AS event_type,
'user_rights_assignment' AS data_type,
g.groupname,
u.username
FROM groups g
JOIN user_groups ug ON g.gid = ug.gid
JOIN users u ON ug.uid = u.uid
WHERE g.groupname = 'Remote Desktop Users'
OR g.groupname = 'Administrators';
```
```sql theme={null}
SELECT
'bloodhound_enterprise_windows_endpoint_osquery_result' AS event_type,
'registry_key' AS data_type,
name,
type,
data
FROM registry
WHERE path IN (
'HKEY_LOCAL_MACHINE\SYSTEM\CurrentControlSet\Control\Lsa\MSV1_0\ClientAllowedNTLMServers',
'HKEY_LOCAL_MACHINE\SYSTEM\CurrentControlSet\Control\Lsa\MSV1_0\NtlmMinClientSec',
'HKEY_LOCAL_MACHINE\SYSTEM\CurrentControlSet\Control\Lsa\MSV1_0\NtlmMinServerSec',
'HKEY_LOCAL_MACHINE\SYSTEM\CurrentControlSet\Control\Lsa\MSV1_0\RestrictReceivingNTLMTraffic',
'HKEY_LOCAL_MACHINE\SYSTEM\CurrentControlSet\Control\Lsa\MSV1_0\RestrictSendingNTLMTraffic'
);
```
1. Log in to CrowdStrike Falcon.
2. Click **IT Automation** > **Run live query**.
 1. Open a new tab and click **Add Filters**.
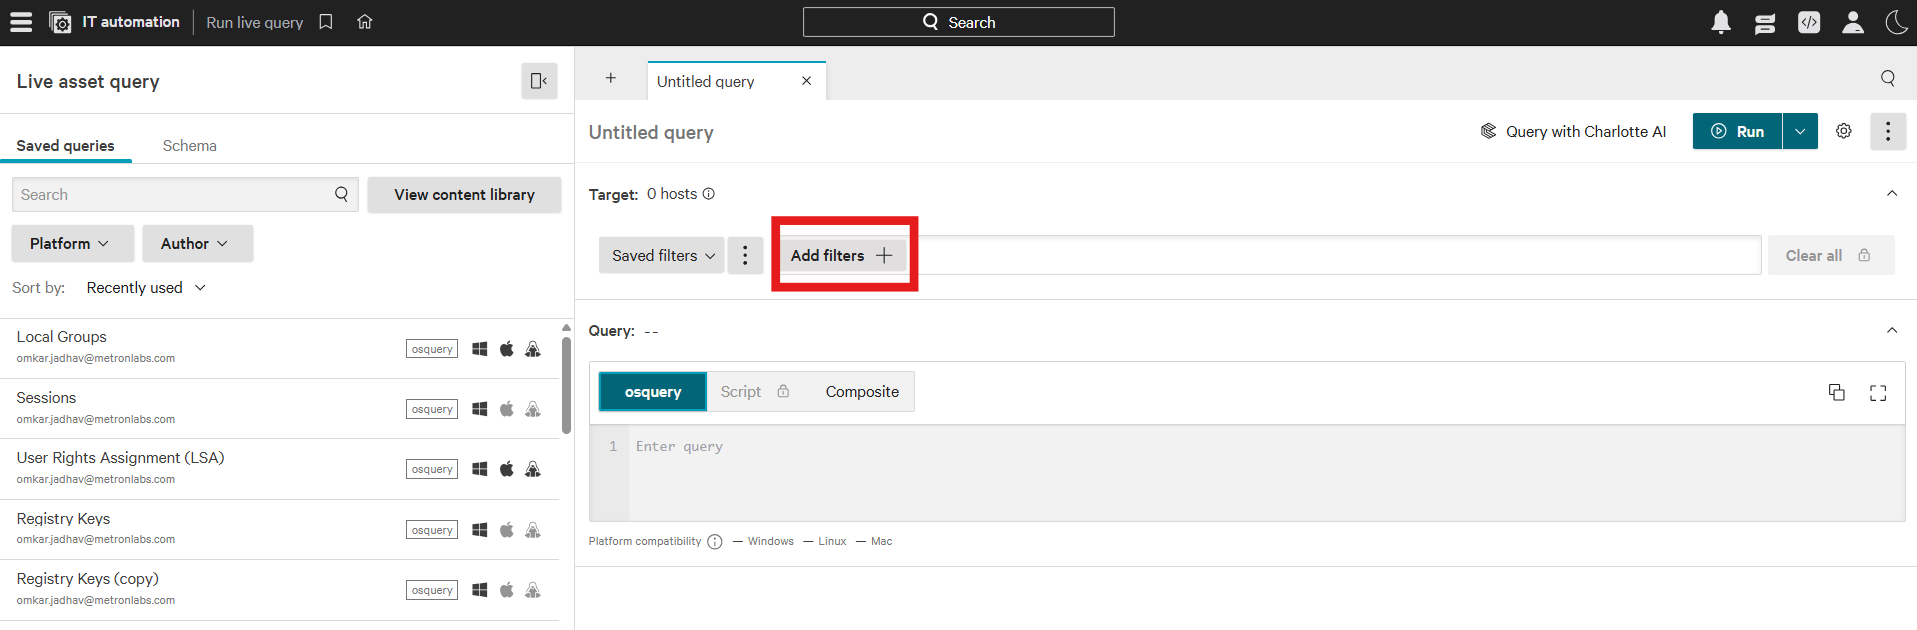 2. Set the filter key to **Host Group**.
3. Select the Falcon host group that contains the Windows devices you want to query.
You must configure each query individually.
1. In the [Required queries](/integrations/crowdstrike/falcon-for-it/configure#required-queries) tabs above, select a query.
2. Copy the full query text.
3. Paste the query into the CrowdStrike query input.
2. Set the filter key to **Host Group**.
3. Select the Falcon host group that contains the Windows devices you want to query.
You must configure each query individually.
1. In the [Required queries](/integrations/crowdstrike/falcon-for-it/configure#required-queries) tabs above, select a query.
2. Copy the full query text.
3. Paste the query into the CrowdStrike query input.
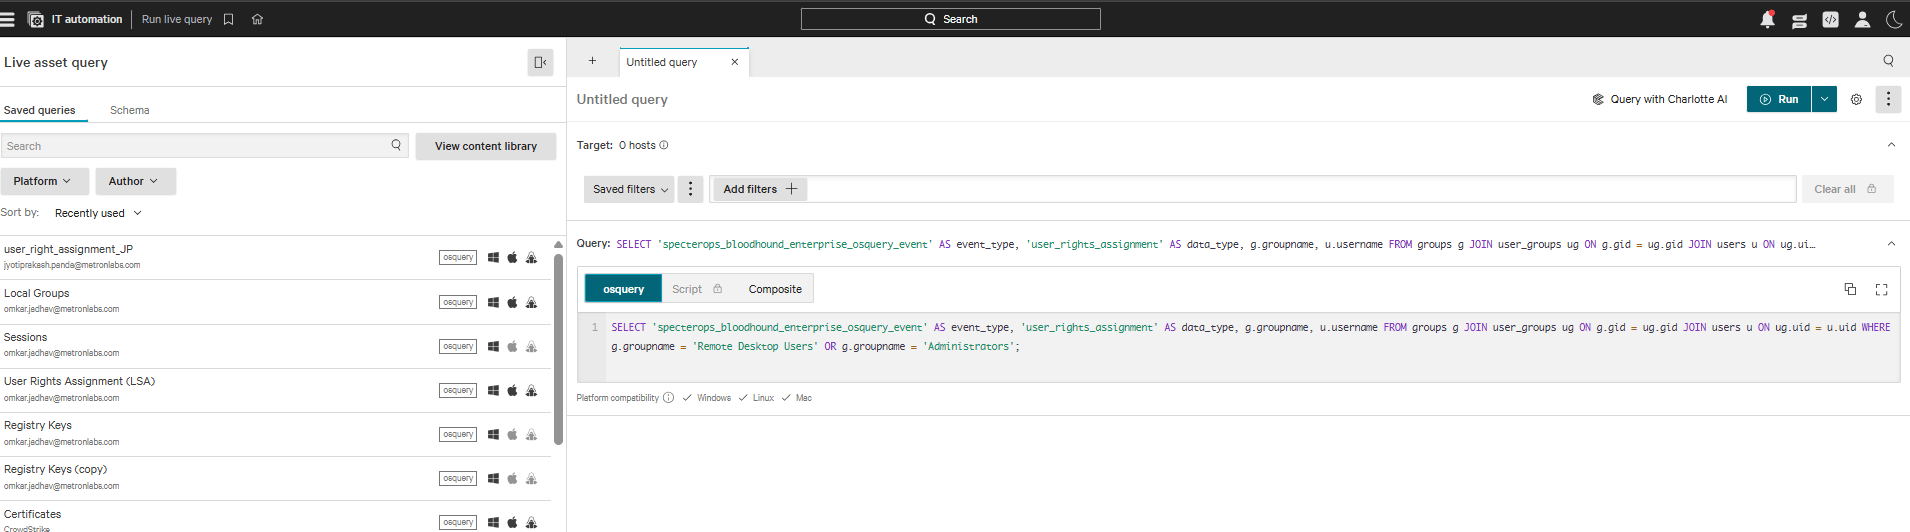 1. Click the ellipsis (three-dot) menu.
2. Click **Save As**.
3. Enter a name for the query and click **Save**.
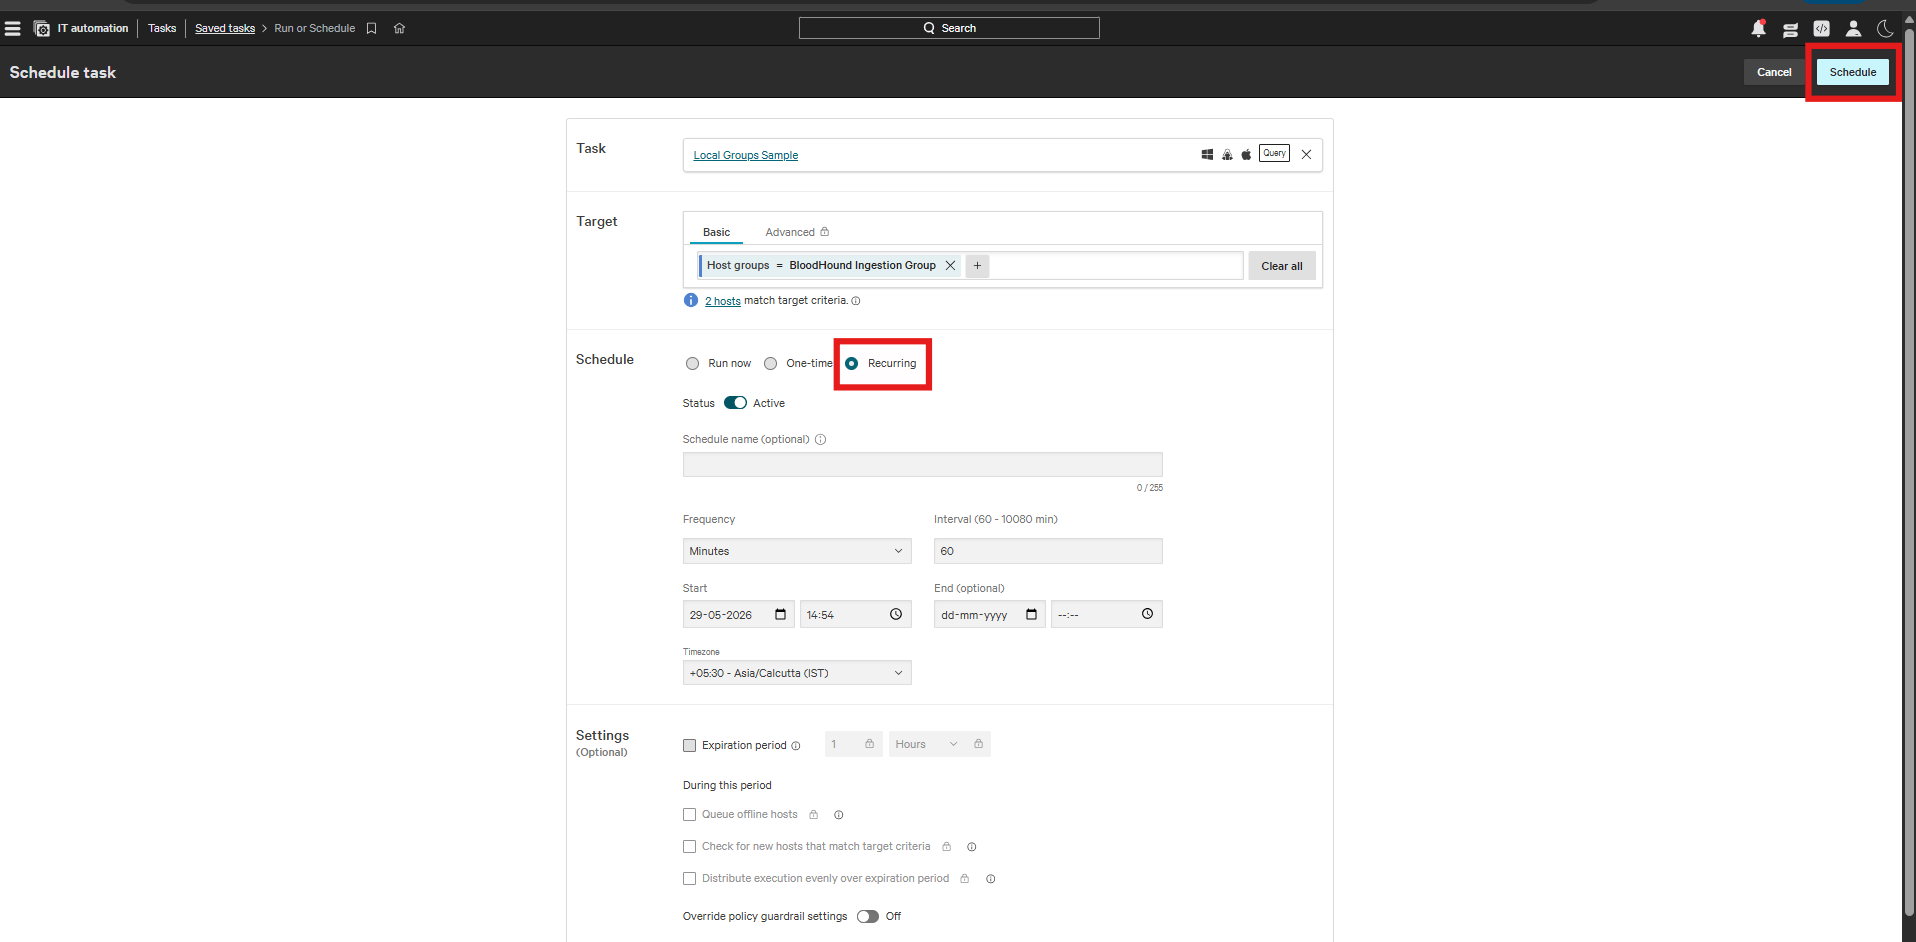
1. Open the dropdownmenu next to **Run** and click **Schedule**.
2. Select the **Recurring** option.
3. Set the frequency unit to **Minutes** and the interval to `60`.
4. Click **Schedule**.
1. Click the ellipsis (three-dot) menu.
2. Click **Save As**.
3. Enter a name for the query and click **Save**.
1. Open the dropdownmenu next to **Run** and click **Schedule**.
2. Select the **Recurring** option.
3. Set the frequency unit to **Minutes** and the interval to `60`.
4. Click **Schedule**.
 Return to the [Required queries](/integrations/crowdstrike/falcon-for-it/configure#required-queries) tabs and repeat the copy, paste, save, and schedule steps for all required queries.
1. Confirm that the target hosts are online.
2. Run the saved queries individually.
3. Review the results pane to confirm that each query returns data.
## Verify query results
Confirm that CrowdStrike routes the query results into Falcon Next-Gen SIEM before you run the BloodHound Enterprise workflow.
1. Log in to CrowdStrike Falcon.
2. Go to **Next-Gen SIEM** > **Log management** > **Event Search**.
Return to the [Required queries](/integrations/crowdstrike/falcon-for-it/configure#required-queries) tabs and repeat the copy, paste, save, and schedule steps for all required queries.
1. Confirm that the target hosts are online.
2. Run the saved queries individually.
3. Review the results pane to confirm that each query returns data.
## Verify query results
Confirm that CrowdStrike routes the query results into Falcon Next-Gen SIEM before you run the BloodHound Enterprise workflow.
1. Log in to CrowdStrike Falcon.
2. Go to **Next-Gen SIEM** > **Log management** > **Event Search**.
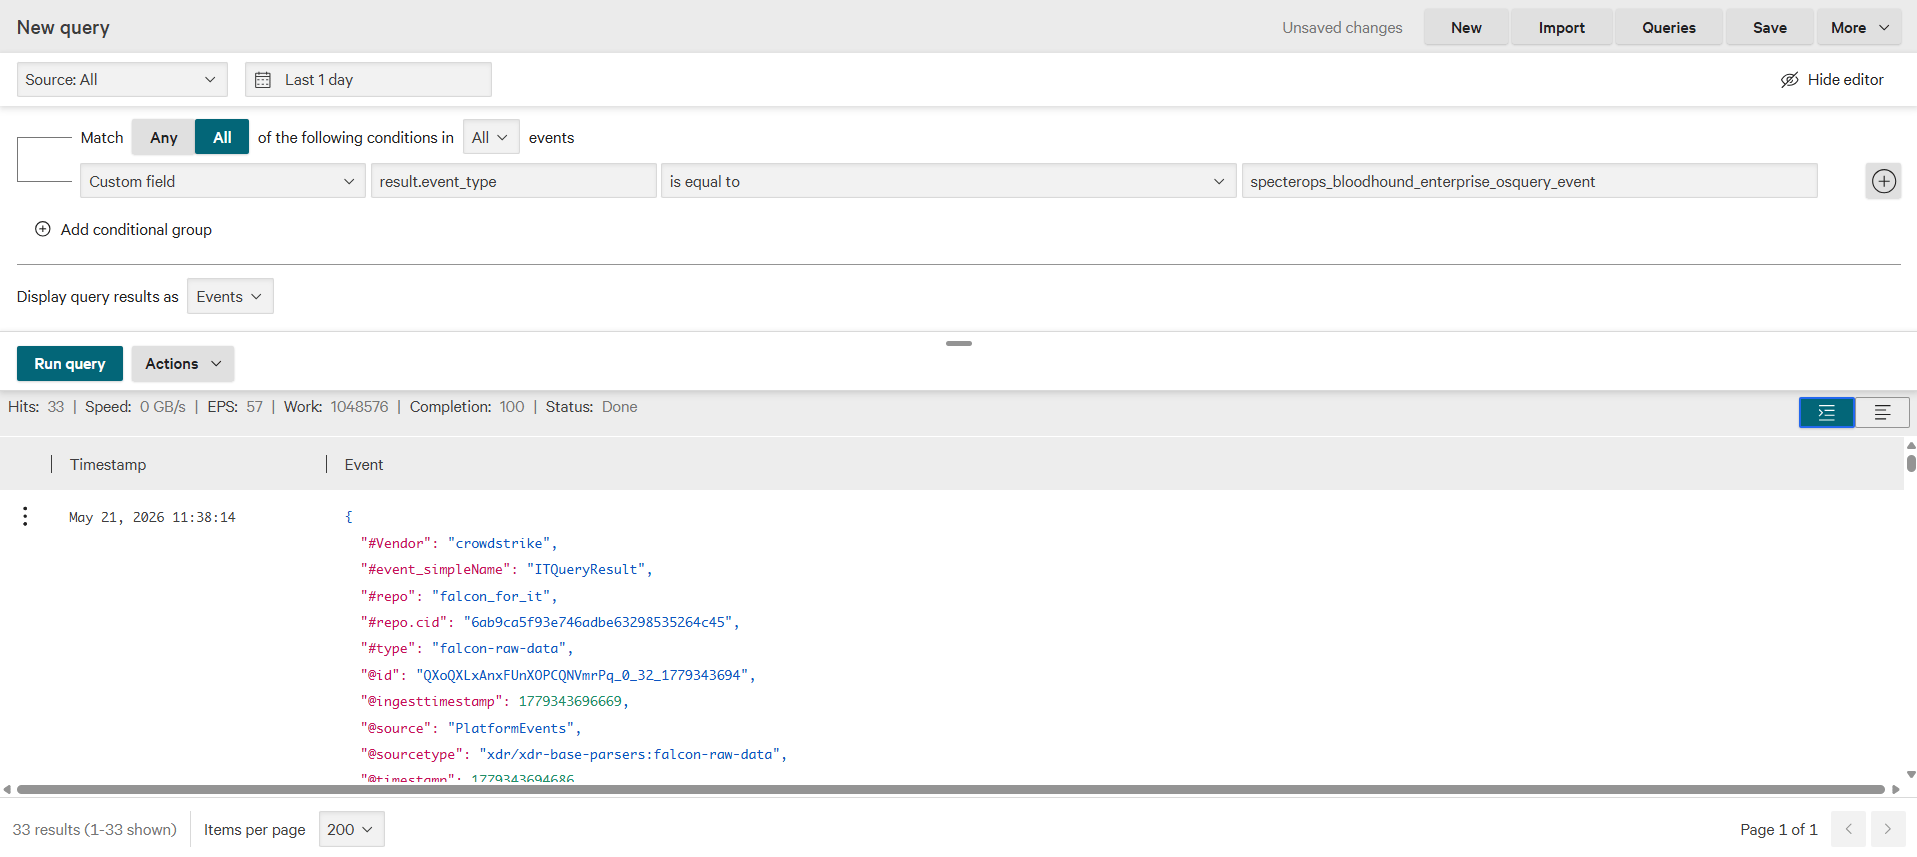
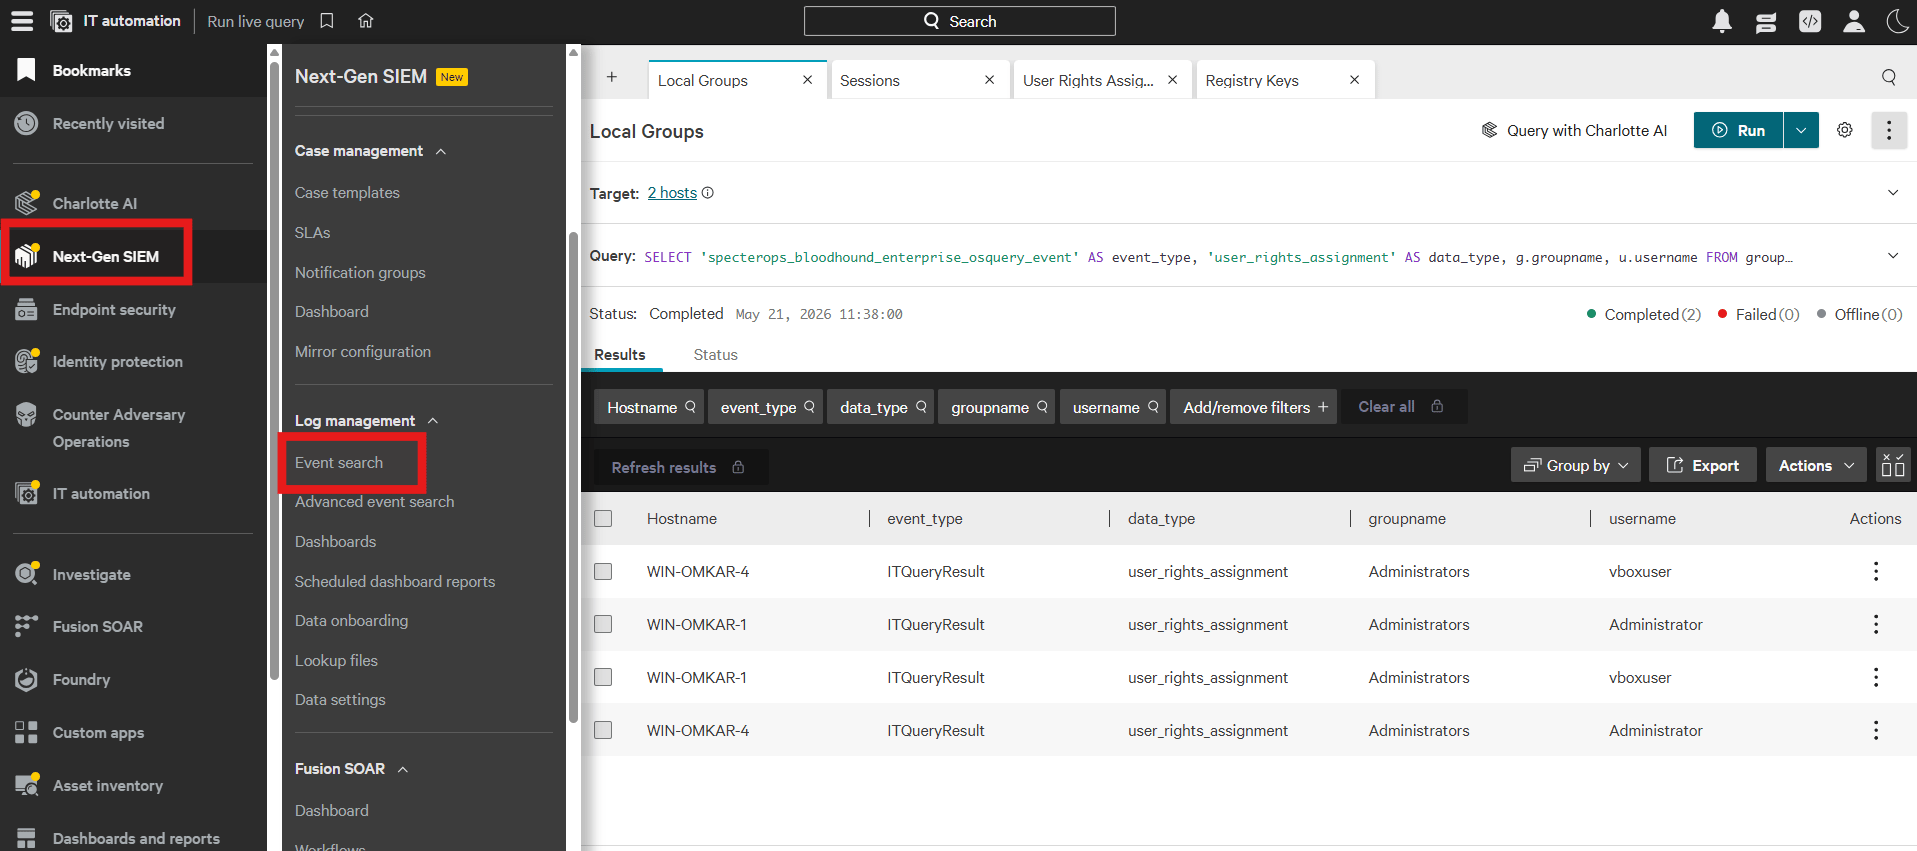 Apply a custom filter with the following values:
| Field | Value |
| ------------ | ------------------------------------------------------- |
| **Field** | `result.event_type` |
| **Operator** | `is equal to` |
| **Value** | `bloodhound_enterprise_windows_endpoint_osquery_result` |
Confirm that matching events appear in the search results.
These events show that the required endpoint telemetry is available for the Foundry workflow to retrieve and upload to BloodHound Enterprise in real time.
Apply a custom filter with the following values:
| Field | Value |
| ------------ | ------------------------------------------------------- |
| **Field** | `result.event_type` |
| **Operator** | `is equal to` |
| **Value** | `bloodhound_enterprise_windows_endpoint_osquery_result` |
Confirm that matching events appear in the search results.
These events show that the required endpoint telemetry is available for the Foundry workflow to retrieve and upload to BloodHound Enterprise in real time.
 ## Next steps
After verifying the query results, you can [run the workflow and verify ingestion](/integrations/crowdstrike/falcon-for-it/use) in BloodHound Enterprise.
## Next steps
After verifying the query results, you can [run the workflow and verify ingestion](/integrations/crowdstrike/falcon-for-it/use) in BloodHound Enterprise.